-- Before buying or using a GuruPlug make sure you first read "the guruplug server plus - major design and qa fail" and "?refactoring the guruplug server plus" --
Yesterday finally my GuruPlug Server Plus arrived. Took longer than expected, but as it seems Globalscale had some issues with the power supplies and they were replaced before shipping the GuruPlugs.
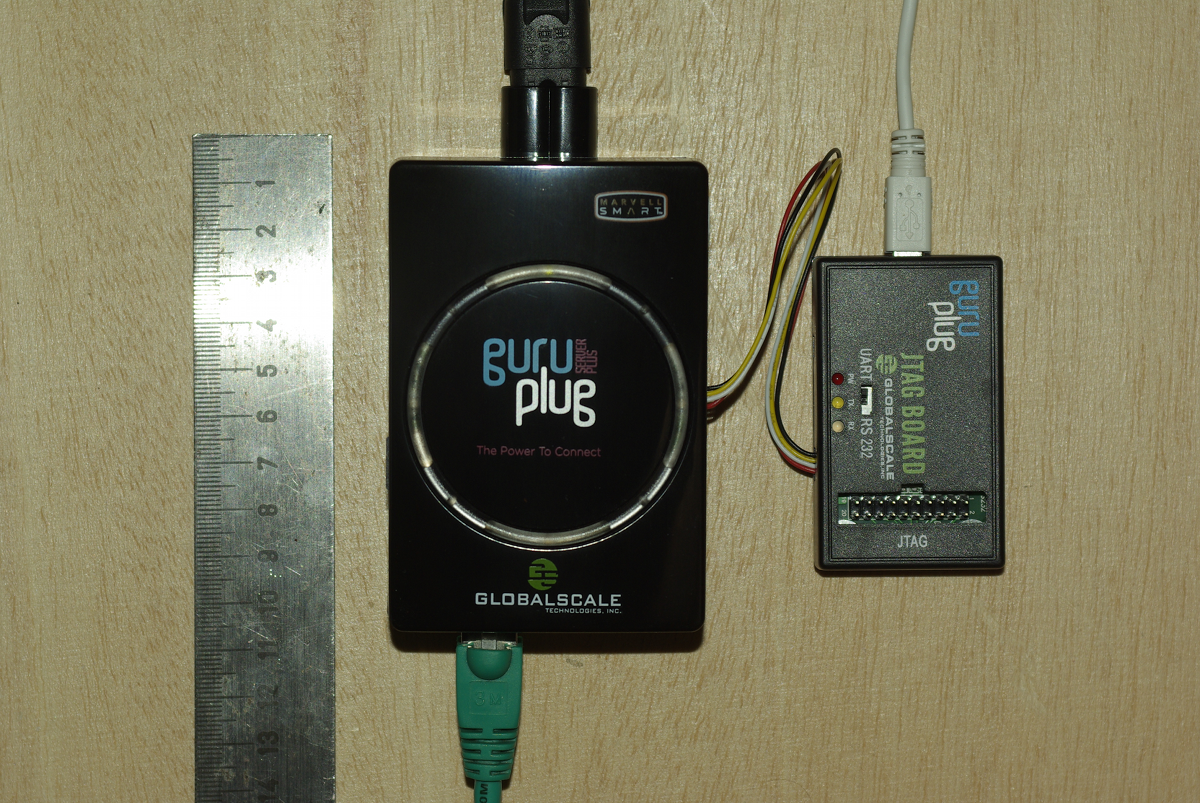
The GuruPlug
Basically the GuruPlugs are an enhanced version of the well known SheevaPlugs, the biggest difference is probably the need for an external JTAG/UART<>RS232 board to access the serial console. Good thing is that the board comes with a normal JTAG connector and an additional RS232 connector and 2.5V DC power outlet, so it will be useful for other devices, too. Globalscale could have chosen different connectors with less wiggly cables, though.
As I was not able to find a useful howto about installing Debian on the Guruplug, I've written down what I did to install Debian unstable on a micro SD card using the Debian installer for the GuruPlug. I did not have a look who modified the Debian installer to work on the plug, but thanks for that! The instructions below are based on Martin Michlmayer's awesome SheevaPlug documentation, the hints from oinkzwurgl.org/guruplug and various forum posts in the plugforum.
Preparations
Please note that I'm not resposible for whatever you're doing with your plug. If you follow this tutorial and end up with a brick, it is your fault, not mine.
To install the GuruPlug you need the JTAG Board. Connect the UART port to the GuruPlug and the JTAG board to your computer, it should show up as FTDI (thanks for using good chips!) USB<>Serial converter. Serial port settings are 115200, 8-N-1, no hw/sw flow control.
The other thing you should prepare is a working tftpd, I'm using aftpd.
apt-get install atftpd
Recent versions share files from /srv/tftp/, in case you're running Lenny /var/lib/tftpboot/ should be the place to drop your files.
When everything is connected properly the boot process should show up in minicom, make sure to press some key to enter uBoot. The first thing you should do is to save the original uBoot environment in case you want to restore the factory settings later. Run
printenv
and save the output somewhere.
Upgrading uBoot
Unfortunately the uBoot version on the GuruPlug is pretty old and seems to have some issues in booting from USB devices, so the first thing you should do is to upgrade it. You might want to investigate if there is even a better, more recent uBoot version available somewhere, or build one on your own, but I didn't bother and took the uBoot.guruplug.bin from here. The main issue with that is that booting from USB still seems to be buggy (even for FAT partitions) and that ext2load is still not supported. Otherwise it works well :-). I'm mainly following Martin Michlmayer's tutorial again.
Download the uBoot.guruplug.bin and drop it into the tftpd directory. Make sure you always set the plug's IP address (ipaddr) and your server's IP address (serverip) properly. I'll use 192.168.121.253 for the plug and 192.168.121.2 for the server in all examples, make sure to change that for your own needs. Stop if something goes wrong, especially when the tftp download failed.
setenv ipaddr 192.168.121.253 setenv serverip 192.168.121.2 tftp 0x6400000 uBoot.guruplug.bin nand erase 0x00000000 0x0100000 nand write 0x6400000 0x0000000 0x80000 reset
Enter uBoot again after the reset.
Preparing the installer
Download uImage and uInitrd to your tftpd directory.
Although I've heard that setting mainlineLinux/arcNumber in the uBoot environment is not necessary anymore for very recent kernel, lets set them to make sure the Debian kernel works:
setenv mainlineLinux yes setenv arcNumber 2097 saveenv reset
Again, enter uBoot after the reset.
Running the installer
Run the following in the uBoot console:
setenv ipaddr 192.168.121.253 setenv serverip 192.168.121.2 tftpboot 0x01100000 uInitrd tftpboot 0x00800000 uImage setenv bootargs console=ttyS0,115200n8 base-installer/initramfs-tools/driver-policy=most bootm 0x00800000 0x01100000
You should see the installer starting now. You might want to follow the following hints:
- Before configuring the network, go back and set the debconf priority to low, Then continue. While chosing the Debian mirror, chose sid as the Debian version to install. If you don't have sid as choice, use a different mirror. The kernel in testing does not boot on the GuruPlug, you need 2.6.32-13 from sid.
- You might want to load the 'network console' installer component and continue via ssh. Makes things fater and colourful.
- Suggested partitioning: I've installed Debian to an 8GB micro SDcard. The SDcard reader is connected via USB and shows up as /dev/sdb (/dev/sda should be the internal NAND and not shown by the installer). I've used 150MB ext2 for /boot and the rest of the space for /, using ext4. You might want to use the noatime option on both filesystems to avoid unnecessary write access to the SDcard. You might choose to add a swap partition, but SDcards are so slow, so I've skipped that.
When you continue the installation, you will hit the following problem:
- The uBoot is not able to boot from your /boot anyway. USB support is buggy and ext2load missing.
We'll work around this issue by writing the kernel and initrd into the plug's NAND. To do so, enter a shell in the installer and chroot into the install target. We'll then scp the necessary uImage and uInitrd to our tftpd directory:
chroot /target /bin/bash cd /boot scp uI* root@192.168.121.2:/srv/tftp
Now leave the shell, finish the installation and reboot, enter uBoot again.
Make the plug bootable
To write kernel and initrd to the NAND memory, we have to transfer it via tftp first, then erase the NAND area we want to write to and then write it to the NAND. The values I've chosen here should be fine for the current Debian kernel, but you might need to change the necessary size for the initrd. To do so have a look at the output while transferring the initrd - the transferred bytes are displayed. They have to fit into the amount of bytes you write (the last option to nand write.e).
setenv ipaddr 192.168.121.253 setenv serverip 192.168.121.2 tftp 0x6400000 uImage nand erase 0x100000 0x400000 nand write.e 0x6400000 0x100000 0x400000 tftp 0x6400000 uInitrd nand erase 0x500000 0x1fb00000 nand write.e 0x6400000 0x500000 0x600000
Now we need to set the necessary boot options. Make sure to change the root device if you've chosen a different layout from that I've suggested above, or if you're not using a SDcard.
setenv bootargs_debian 'console=ttyS0,115200 root=/dev/sdb2' setenv bootcmd_nand 'nand start; nand read.e 0x00800000 0x100000 0x400000; nand read.e 0x01100000 0x500000 0x600000' setenv bootcmd 'setenv bootargs $(bootargs_debian); run bootcmd_nand; bootm 0x00800000 0x01100000' saveenv run bootcmd
Finish
Your GuruPlug should boot your new Debian installation now. Have fun! I'll try to keep the howto updated for changes in uBoot and the installer, but I might not have the time to so quickly. Patches and comments are welcome!.
root@guruplug:~# uname -a Linux guruplug 2.6.32-5-kirkwood #1 Fri May 21 05:44:29 UTC 2010 armv5tel GNU/Linux root@guruplug:~# cat /proc/cpuinfo Processor : Feroceon 88FR131 rev 1 (v5l) BogoMIPS : 1192.75 Features : swp half thumb fastmult edsp CPU implementer : 0x56 CPU architecture: 5TE CPU variant : 0x2 CPU part : 0x131 CPU revision : 1 Hardware : Marvell GuruPlug Reference Board Revision : 0000 Serial : 0000000000000000 root@guruplug:~#

Please contribute to this effort:
http://wiki.debian.org/InstallingDebianOn
Seems I was lucky that I got a model with a fixed power supply. The box becomes pretty warm, but not too hot, so I'm not really scared yet. I think a nice alloy case you have been better than the (still a bit smelling) plastic case. The only thing that makes me wonder a bit is that the sd-card slot seems to become really warm, not sure if the card will like that on the long run. But so far I'm really happy with it, but I did not yet connect any harddrive to it. Also I did not look into the AP-features of the wifi chip, which seem to require some proprietary tool. So far I can tell that the firmware in Debian unstable doesn't seem to work:
Guess I should build a new Kernel as soon as the HDDs for the plug arrived.
Hi! Thank you very much for your tutorial! Is there any chance to install lenny or squeeze and use the kernel from sid?
The firmware is shipped on the original Debian installation in /lib/firmware/mrvl/* and you need the user tool /usr/bin/uaputl. Maybe you can also fetch them from http://www.plugcomputer.org/index.php/us/resources/downloads?func=fileinfo&id=77.
For the libertas: maybe you can use the driver from Marvell http://extranet.marvell.com/drivers/driverDisplay.do?driverId=203 Didn't try that for my own.
FireHawk
The easiest way to use a recent kernel would be to use the kernel from backports.org - but I'm not sure if the last kernel there will work on the Guruplug. Installing the packages form sid directly should not work due to dependencies you can't fulfill in Lenny. What you could do is to download the linux-image from sid and extract the kernel and modules manually. That's a hack, but it might work.
In case it might be useful for somebody, I've uploaded the uImage.bin and uInitrd from linux-image-2.6.32-5-kirkwood 2.6.32-13 here.
Not exactly sure what happens here during shutdown, had a look to late. Sounds like insserv f*ckup - or something else. Needs investigation....
Small typo in the install command for atftpd, it should be:
apt-get install atftpd
Is there a solution for the following problem? [ 31.619957] libertas_sdio mmc0:0001:1: firmware: requesting sd8688_helper.bin [ 31.684817] libertas: can't load helper firmware [ 31.689462] libertas: failed to load helper firmware
The libertas driver files (can be found in the original rootfs from guruplug.org): sd8688.bin and sd8688_helper.bin
should be placed in /lib/firmware
They are then loaded upon boot automatically.
The kernel in testing does not boot on the GuruPlug, you need 2.6.32-13 from sid. [...] root@guruplug:~# uname -a Linux guruplug 2.6.32-5-kirkwood #1 Fri May 21 05:44:29 UTC 2010 armv5tel GNU/Linux
So ? Both works or there an error ?
I am trying to install Debian Sid on my GPS as per the great tutorial above, but I am stuck at the following step:
Before configuring the network, go back and set the debconf priority to low, Then continue. While chosing the Debian mirror, chose sid as the Debian version to install. If you don't have sid as choice, use a different mirror. The kernel in testing does not boot on the GuruPlug, you need 2.6.32-13 from sid.
How do I know which is the correct mirror to get Debian Sid? I am trying to manually enter the following address, but it is not recognised as a valid ftp server: ftp.debian.org/debian/dists/unstable
Additionally, I would like to know how to perform the next step: You might want to load the 'network console' installer component and continue via ssh. Makes things fater and colourful.
And at last, I would be really thankful if somebody could tell me how to enter a shell in the installer and chroot into the install target.
Many thanks in advance!
~Aleš
@comment 11: Please read the installer documentation, it should answer these questions (hint: just chose a mirror from the provided list and look trough the main menu properly).
@2.6.32-13 or 2.6.32-5: Good question - all I remember is that some guruplug specific patches went into the kernel - not sure what the exact issue was, though.
Well, i follow the tuto and my kernel is 2.6.32.5 I don't change the priority of debconf and i don't select a SID repository And all works good
But when it 'll be possible to boot on SDcard i will see for upgrade my configuration, but at this moment i stay like this 
I followed the guide, and have completed the installation to this point, now I am stuck...
We'll work around this issue by writing the kernel and initrd into the plug's NAND. To do so, enter a shell in the installer and chroot into the install target. We'll then scp the necessary uImage and uInitrd to our tftpd directory:
chroot /target /bin/bash cd /boot scp uI* root@192.168.121.2:/srv/tftp
When I run the chroot command I recieve, ~ # chroot /target /bin/bash chroot: can't change root directory to /target: No such file or directory
So I am unable to find my uImage and uInitrd to burn to NAND.
Any idea to help me out? Would be much appreciated.
Karl,
seems you entered the shell too late in the install process and /target is already unmounted. Which means you have to mount it manually before chroot-ing into it:
will help you if you replace YourRootDevice by the device your new / directory will be mounted from. /dev/sda1 could be a good guess, for example. In case you have /boot on a seperate partition, mount that into /target/boot after mounting /target. Then chroot as described. Hope that helps
Hey Guys,
after installing this and getting it all working (thanks alot guys) i only seem to have one of the LAN ports working, is that correct?
for the life of me i cant work it out, only eth0 is listed and wlan0 but i should have eth1? as my second lan port?
thanks
You should be able to see eth0 and eth1. Probably your Plug fried itself to death already?
Everything went well for me until the end where I receive:
Marvell>> run bootcmd nand - NAND sub-system
NAND read: device 0 offset 0x100000, size 0x400000 4194304 bytes read: OK
NAND read: device 0 offset 0x500000, size 0x600000 6291456 bytes read: OK Wrong Image Format for bootm command ERROR: can't get kernel image! Marvell>>
It seems like a problem with the version of uBoot I'm using but that doesn't make sense as I used the one linked to in this guide. My head hurts and I would appreciate a fresh perspective if anyone is willing to offer their thoughts.
Thanks, J.T.
Did you probably transfer the vmlinuz image into the NAND? Or some other file? You'll need the uImage/uInitrd files.
Never mind, I got it. Took some research but I found a similar problem referenced in an OpenMoko thread where the problem came about due to messed up nand environment. I decided to look through my log file and low and behold I noticed that I forgot to set the offset for my first nand erase command which I believe had the effect of completely erasing my nand. Not quite sure what could have been in there that would have made the difference in the end since I should only have needed my uInitrd and uImage, however after restoring a stock nand then placing my uImage/uInitrd again everything worked as expected. Worth noting that I had replaced these files with my own and the ones linked to in the comments multiple times with no change until the nand restore.
Thank you for the great guide,
As an aside, I have since reran the installer due to a nagging error I worked through the first time and on my second install I forgot to select the Sid repository. Turns out I have a perfectly functional Squeeze install, don't know what the prior limitations were with Squeeze and your method but it appears to have been resolved. Just a heads up for anyone that may want Squeeze, go for it.
Hey!
I wanna do the debian install, but as i begin to run the installer everything will be messy. What can i do?
You need to configure your terminal program properly. Here is a working piece from my minicom default config which should work fine:
Hey!
I used the correct parameter. I get such a messy in my console:
[1;24r[4l(B)0[m[1;24r[H[J[1;1H[9;3Hlqqqqqqqqqqqqqqqqqu[m Checking the Debian archive mirror tqqqqqqqqqqqqqqqqqqk[10;3Hx[73Cx[11;3Hx[m [4m 0% [m x[12;3Hx[73Cx[13;3Hx[73Cx[14;3Hx[73Cx[15;3Hmqqqqqqqqqqqqqqqqqqqqqqqqqqqqqqqqqqqqqqqqqqqqqqqqqqqqqqqqqqqqqqqqqqqqqqqqqj[13;5H[mDownloading Release files...[44C[13;5H[11;5H[4m[7m [17C[m[4m25[13;5H[11;22H[m[4m[7m 5[m[4m0[13;5H[11;39H[m[4m[7m75% [13;5H[11;38H100[17C [m [13;5H[9;3H[K[10;3H[K[11;3H[K[12;3H[K[13;3H[K[14;3H[K[15;3H[K[16;2H[24;1H[m
[1;24r[4l(B)0[m[1;24r[H[J[1;1H[6;3Hlqqqqqqqqqqqqqqqqqu[m [!!] Download installer components tqqqqqqqqqqqqqqqqqqk[7;3Hx[73Cx[8;3Hx[m The installer failed to download a file from the mirror. This may be x[9;3Hx[m a problem with your network, or with the mirror. You can choose to[6Cx[10;3Hx[m retry the download, select a different mirror, or cancel and choose[5Cx[11;3Hx[m another installation method.[44Cx[12;3Hx[73Cx[13;3Hx[m Downloading a file failed:[46Cx[14;3Hx[73Cx[15;3Hx[28C[m[1m[7mRetry [32C[mx[16;3Hx[28C[mChange mirror[32Cx[17;3Hx[28C[mCancel[39Cx[18;3Hx[73Cx[19;3Hmqqqqqqqqqqqqqqqqqqqqqqqqqqqqqqqqqqqqqqqqqqqqqqqqqqqqqqqqqqqqqqqqqqqqqqqqqj[24;1H[m moves; selects; activates buttons[15;32H
Hey!
I set the correct parameter. So the reason was for the messed up console, that i used the default serial console on my mac, called screen. With zoc6 it works perfect.
Hey!
The debian install was success, then was coming the reboot, after it start up u-boot and booting kernel, loading ramdisk, loading kernel, starting kernel, starting system log daemon, all success, and then comes again the install script. And it happens again and again, as a vicious circle
Dear Sirs, I've try your way to make the PlugPBX on Guruplug Server Plus by MicroSD. Having some minor error message however it did boot. I am going to test and post the step by step to PlugPBX.org
Wish this project runs well.
Best Regards Adam KUO Science Innovation Co., Ltd.
Hi,
when the installation is done and I chroot into /target, I only find vmlinuz and the usual linux-files in /boot, there is no uImage and uInitrd that I could scp... What could I have done wrong? I selected sid and I think I followed everything in the Guide
thx
hello,
I use your explaination, it work fine.
I use this explaination too : http://oinkzwurgl.org/guruplug_uboot, and now, I'm able to directly boot from the /boot ext2 FS.
thank a lot
Thanks for your post which almost got me going with a GuruPlug Plus on Debian Squeeze. However, I'm still having trouble getting this to work with LVM. My blog article mentions the details (timing of when device mapper and storage and LVM are run it seems.
Since you seem to have solved many of the problems with GuruPlug perhaps you have some ideas?